Before the coming of digital technology and the Internet
books were the main source of information. Students would spend time leafing
through books, newspapers, and journals as sources for information. The process
of finding a large amount of information was tedious but creditable. Now today
with the use of the Internet we can access information about anything and
anyone. The Internet is used in every subject area to research history and
specific topics. It is a great way to explore and learn about the world from
the classroom.
In an art education class the Internet
is used to either find sources of inspiration and reference or to research an
artist and their works. I recently observed an art classroom where the students
were given an artist autobiography project. The teacher stated “Sometimes I
feel like I give this report to give myself a break”. But during this project
the student still need instruction and guidance. But intern, this project can
be useful for an art education class so that students can become inspired by
new artist as well as develop good researching skills. The students were given
an artist by picking a name out of a basket. This report was to be 5 pages long
that included, a title page, a history page, an artwork page, and an opinion
page. Before the students began the librarian informed the students of a library
database and to make sure the sources being used were creditable. Making
students aware than everything they read on the Internet is not true and must
be checked and retrieved from well know or credible sources.
So this brings me to the question will the Internet ever completely
replace books?
If books are eliminate and become obsolete, what will we do
if technology fails us?
Will we lose all the information or will there be advancements
that insure that data will not be lost?
Personally I believe that both are important to have in and
outside the classroom, each with their pros and cons.
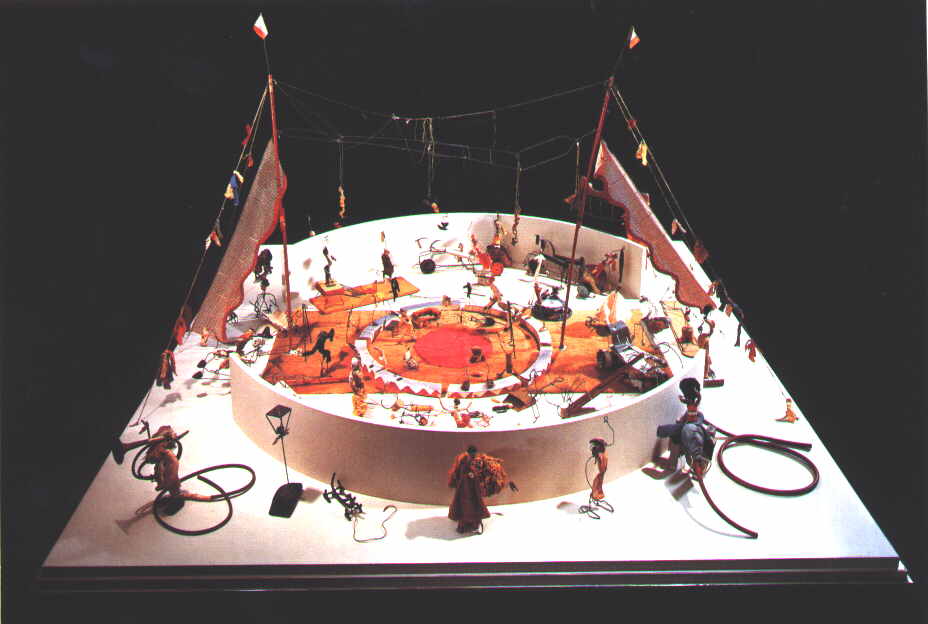
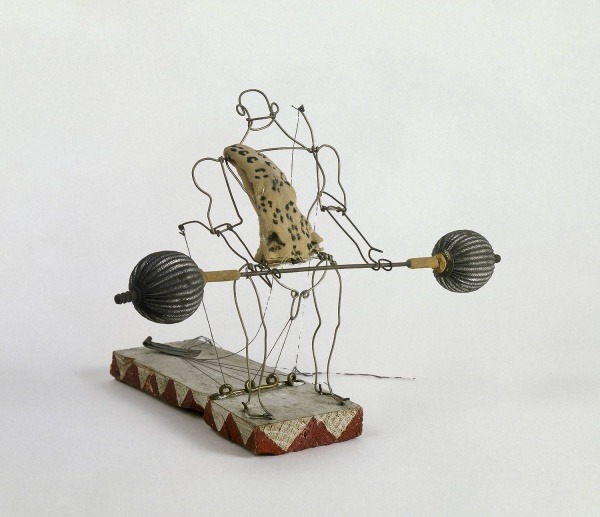
The lesson plan I adapted was a
collaborative sculpture project based on Alexander Calder’s wire circus. The
concept theme is based on performance and Students are expected to create an
original character for a collaborative class installation. This lesson lacked
strategies and the students did not utilize digital technologies during this
project.
This particular project was one of
my favorites when designing and making the sample product for my art methods
class. But now, reviewing the teaching strategies and technologies in my
Alexander Calder lesson, I have discovered revisions and additives that can be
used to transform and transcend this already exciting lesson.
While
reflecting on Alex Calder lesson plan I realized my Canvas lesson, which was an
introduction of Claymation, would merge perfectly with my chosen lesson. Both
lessons incorporate technology and performance.
To begin this fusion I would first
identify the artist in which the students project stems from, Alexander Calder.
A slide show lecture would be presented accompanied by example videos on
Youtube as well as a documentary video. This combination of technologies would
help students graphically organize, which would help them to understand the
many influences and progressions of technology that changed Alex Calder’s work.
Learning about the artist and his work will also begin to inspire the students
creative thinking.
Students would then complete the
KWL charts for both the teacher and students to track and assesses development
and understanding that has been achieved. This will help to reach learning
targets and reassess and evaluate students learning and the lesson plan.
Next students would be given a
Frayer Model based on the word Performance; each student would complete this
sheet individually. A group discussion would be held based on the Frayer Model,
making connections between the similarities and differences students shared.
The teacher will guide students critical thinking using probing questions.
Students would then have a change
to begin to research many types of performances, along with finding more
information about Alexander Calder’s work.
The graphic Organizer would also be
used during this exercise to help students analyze and synthesize this
information into the planning of their character.
For homework students would then
begin to brainstorm and plan by drawing four possible characters they would
consider creating; as well as collect some objects that would aid in the
production of their character.
At the start of class students
would be given a demonstration using a document projector so
student can remain
seated and still see a close up of the exact procedures being performed. During
the demonstration the teacher would answer any question, while simultaneously
asking students questions to check for understanding. The students will be
provided with a checklist to ensure all elements and guidelines are included in
their project so they can create a successful product. Students choose a
character from their homework assignment and begin creating their character
from metal wire and various found objects. At this time students still will
have access to the Internet for any further referencing.
This next stage of the integrated
lesson involves the use of elements from both lesson plans. During this time
the teacher will give a brief demonstrations and lecture to inform
students on
how to use the cameras, allowing students to begin planning. Students will
begin by brainstorming during a group discussion while comparing and contrasting
ideas using storyboards. Students will break into individual groups, where
specific jobs will be assigned to ensure the process of the production runs
smoothly.
For the completed project students
will have created a cohesive and original class film. The film will incorporate
all of their characters in the performance by using video cameras and editing
programs on the computer. During the final stage the students will all participate
in making editing decisions. When finished students will also upload the video
to their individual blogs as well Youtube.
For the final stage a reflective
group critique and discussion will be conducted to review the KWL charts they
completed in the beginning of the project as well as their personal and
collaborative projects. This will allow the teacher and students to assess
their successes and progress that will also be reflected on the student’s exit
cards. Students are asked to post on at least three peers blogs, to communicate
their personal observations, thoughts, and feelings on the projects success,
individually and as a whole.
Overall this integrated technology
lesson demonstrates how the use of technology can enrich and transform lessons
in this new age of technology in the classroom.
Creating a portfolio is an
important part of being an artist. It not only shows all of the work that has
been produced, but the progression of skills and concepts through out ones
career. All students in an art classroom should be seen as young artist because
they all have the potential to become a member of the art world.
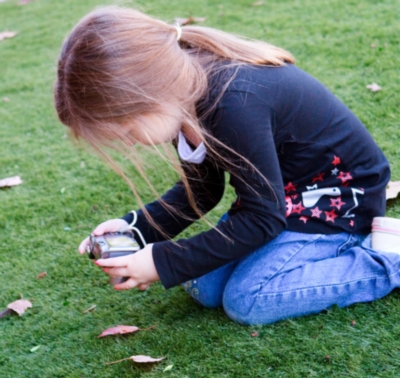
Students can learn to photograph
their work artwork in the classroom to share on a website, blog, or to create
an inventory. Learning how to photograph their work well is extremely helpful
and important, especially for serious art students that will eventually send
out portfolios to various colleges or galleries.
Teachers can document photographs
of their student’s works and create an online gallery to show case the artwork
that students put effort into. This can also be seen as a honor that will
encourage student to put forth more effort into their project and take pride in
their work. Show casing it in this was gives importance to the student’s
accomplishments. This also showcases the abilities and effectiveness of the
teachers teaching, while simultaneously representing the highlights of the school
and its community.
Digital cameras are a great technology
to bring into the art classroom. Students can learn to use this technology and
can be integrated into the art classroom. Both the teacher and students can use
this tool in several different ways. An example: Students can learn how to take a
photograph and create a lesson based on composition, and what makes a good
photograph. By teaching the applied visual elements and techniques, students
can apply them when using this technology. This will supply the students with
additional tools and medium in which they can then apply, experiment, and
express themselves creatively and productively through this medium.
The teacher can use the digital
camera for a self-portrait lesson, which are commonly implemented in the art
classroom. This is a great way to get students to begin to become familiar with
drawing faces. Student will be provided with a still image of himself or
herself to replicate. When executing self portrait drawings from a mirror for
the first time can be frustrating and somewhat distracting for students.
Providing them with an image of themselves, with any facial expression of pose
of their choice, make the project fun and allows the students to focus on the
unchanging proportions, lines, shapes, shadows, etc.

 Vs.
Vs.